Now that you've built your betterbunch account, the next step is to send retrospective invitations to your previous customers. This article shares instructions on sending retrospective invites and explains why they're so important!
Welcome aboard! Sending feedback invitations to your customers is not just about checking in; it's about building trust, improving your services, and boosting your online reputation.
The aim of the betterbunch game is to follow up with every customer after a job is complete, but more on this shortly.
To begin with, we recommend sending invitations to every customer you have serviced in the past 12 months - We call this a retrospective invitation and trust us, it's a game-changer!
First off, why send retrospective invitations?
Well, even though it's been a while since you last interacted with these customers, they can still have great experiences to share. Reaching out now can kickstart your journey with betterbunch and potentially lead to a flood of positive reviews.
Sending retrospective invitations can also help bring any problems to light that you may have overlooked recently - giving you the chance to save repeat business.
Just look at how Car Therapy Centre scored 42 reviews overnight using this exact process!
So, how do you send a retrospective invitation?
Check out the video below; it's simpler than you might think.
Step 1. Send yourself a test invitation
Sending yourself a test invitation is important! It will help you avoid a potential facepalm moment, such as forgetting to upload your company logo or, even worse, prompting clients to leave reviews on someone else's page.
- Login to your betterbunch account
-
Click Create Invitation on the top right of your dashboard
- Type your own first name and cell phone number into the text boxes
- Click Send invitation, and select the Send Now option
- Wait a moment for the test invitation to arrive on your phone, then follow the prompts as though you were going to leave a Google review. Don't forget to check the quality of your business logo and that you're taken to the correct Google Business Profile.
- Remember to reach out via the chatbot if you have any questions!
Step 2: Create a list of past customers
Now, to the fun part. We need to compile a list of customers that you have serviced recently. We recommend that this list contains every customer that you have serviced in the past 12 months.
The list of customers you'd like to send invitations to needs to include your customer's first name, email address and/or mobile number, and look similar to this.
Most jobs management and invoicing platforms will allow you to export customer data into an Excel, Google sheet or .csv file format, so we recommend extracting the list from your software provider where possible (rather than creating a list manually) - a big time saver.
If you're unsure how to download a list of your recent customers from your software platform, we suggest sending the below email to your software support team.
"Hey team,
I was hoping you could help me out.
We want to download a list of every client we've serviced in the past 12 months. Can you please help us generate this list? For reference, here's an example of what it needs to look like.
It needs to be in Excel, Google Sheets or .csv format and contain:
a) The customer's first name
b) Their email address
c) Their mobile phone number
Step 3: Format the list
Often, the list you export from your job management provider will contain additional information that is not required, such as physical address, last name, or job number, so we may need to quickly format the list to get it ready for sending.
- Begin by opening the list in Excel or Google Sheets and deleting any unnecessary columns. Ensure your list only contains the customer's first name, email address and mobile phone number, as shown below.
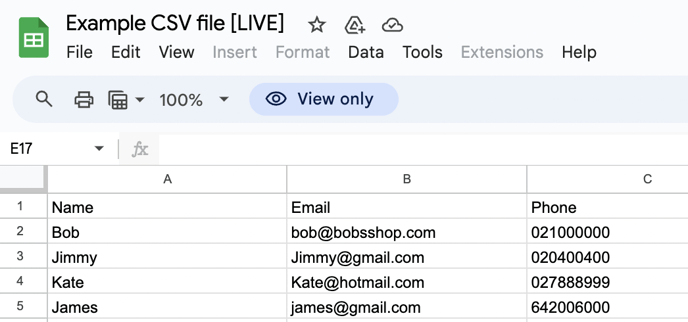
- Up next, you need to ensure the column headers (row 1 of the sheet) are named correctly. Ro 1 must contain the words 'name', 'email' and 'phone' only, as shown above.
This helps betterbunch identify what information is in each column. - Double-check that the 'name' column only has the customer's first name. For example, 'Bob', not 'Bob Jones'. This is the name that will be included in your invitation, so we want to be sure we address the customer by their first name only, keeping things personalised.
- Once you've finished formatting, save your formatted list as a .csv file. Simply click on 'File', then 'Save As', and choose the .csv file format option.
Step 4: Send!
Now that you've done all the prep work, it's time to send out your retrospective invites.
- If you're not looking at it already, log in to betterbunch and head to the bulk upload page
- Upload your customer list by clicking browse and selecting your retrospective .csv
- Before you click send, we suggest editing your text message to better suit your brand tone. This is a great way to increase interactions with your invites.
- Click Edit Invitation
- From the Select a Template dropdown, choose Custom 1, and type the message you'd like to send.
You can see what the invitation will look like on the display phone on the right side of the screen. Feel free to copy and paste our example below.
Hi {recipient_name}! {business_name} here.
We know it's been a while, but can you share your thoughts on the job we did here:
{invitation_url}
Thanks, it means a lot! - Click Update for this send only to save your changes. This ensures these messages use the retrospective template, but your future messages will remain the same as your default invitation settings.
- Similarly, consider changing your email invitation template to something more 'on-brand' too.
- Click Edit Invitation, then navigate to the email template tab and type your message. Feel free to copy and paste the example below.
Hi {recipient_name},
Thanks for choosing us for your job. We know it has been a while, but we're very interested in hearing your thoughts on our service. Your feedback can help us grow and improve our offerings, so it's really appreciated.
Simply click the buttons below to let us know how we did.
We hope to hear from you again soon,
The {business_name} team - Again, click Update for this send only to save your changes and ensure these messages use the retrospective template, but your future messages will remain the same as your default settings.
- Click Edit Invitation, then navigate to the email template tab and type your message. Feel free to copy and paste the example below.
- Lucky last, when you Send Invitations, we suggest choosing to send your invitation later and opting to send them at the best time in 24 hours. We monitor when your customers are more likely to interact with your invitations to help increase your conversion rates.
- Done!
Step 4: Learn how to use betterbunch going forward
Now that you've mastered sending retrospective invitations, why stop there?
The aim of the betterbunch game is to follow up with every customer after their job is complete.
If you haven't already, be sure to check out our tips on creating your review domination strategy.
Happy inviting!