
Once your Simpro account is connected to betterbunch, you can update your automation rules at any time.
Your rules control:
- Which Simpro job statuses trigger an invitation
- Which contact types receive the invitation
- When the invitation is sent
- Which jobs should be excluded
Before you start
This article is for businesses that have already connected Simpro to betterbunch.
If you have not connected Simpro yet, start with the Simpro automation setup guide first.
Open your Simpro automation settings
- Log in to your betterbunch account.
- Go to Automation in the left menu.
- Select Edit on the Simpro tile.
You’ll be taken through your Simpro automation rules in two steps.
Step 1: Set your sending rules
Sending rules decide which jobs trigger an invitation, who receives it, and when the invitation is sent.
Choose your job statuses
In the Job statuses field, search for and select the Simpro job status or statuses that should trigger an invitation. For example, you might choose statuses like:
- Job completed
- Invoice completed
betterbunch will create an invitation whenever a job moves into one of the selected statuses.
Choose who receives the invite
Under Send the invite to, choose which contact types should receive invitations. You can select:
- Company contact: The main contact on the customer’s company record in Simpro.
- Individual contact: The person named on the job itself.
- Site contact: The contact attached to the job’s site.
Tip: We recommend selecting all contact types to maximise your chances of receiving feedback.
Choose when to send
Under When to send, choose when the invitation should be sent. You can select:
- Best time to send: betterbunch picks the moment each recipient is most likely to open and respond.
- Right away: Sends as soon as the job reaches one of your selected statuses.
- After a delay: Waits a set number of hours after the status change before sending.
- At a specific time: Sends at the same time every day.
If you choose After a delay, enter the number of hours you want betterbunch to wait before sending the invitation.
Select Next to continue.
Step 2: Set your exclusion rules
Exclusion rules stop certain Simpro jobs from triggering invitations. For example, you may want to exclude commercial jobs, warranty jobs, or jobs from a specific region.
This step is optional. Use exclusion rules if you want to prevent invitations from being sent for specific:
- Cost centres
- Tags
- Zones
Choose what to exclude
In the Exclude jobs by dropdown, choose one of the following options:
- Don’t exclude anything
- Cost centre
- Tag
- Zone
If you do not want to exclude any jobs, leave this set to Don’t exclude anything and select Skip and finish.
If you choose Cost centre, Tag, or Zone, enter the exact Simpro value you want to exclude.
Important: Exclusion text must match Simpro exactly, including spelling and spacing.
Review your setup
Before saving, betterbunch will show you a summary of how invitations will be sent.
Review the details carefully, including:
- Which job statuses trigger invitations
- Which contacts receive invitations
- When invitations are sent
- Any excluded cost centres, tags, or zones
If everything looks right, select Save setup.
If you need to adjust anything, select Make changes.
Test your setup
After saving your setup, we recommend testing your automation.
To test your setup:
- Create a test job in Simpro using your own contact details.
- Move the job into one of your selected trigger statuses.
- Check that the invitation is created and sent as expected.
Frequently asked questions
-
Can I use Simpro automation if one account services multiple sites? Yes. You can link one site from your Simpro account to your betterbunch account.
-
Can I choose more than one job status? Yes. You can select multiple Simpro job statuses to trigger invitations.
-
Can a job send invites to multiple contacts? Yes. You can send invitations to the company contact, individual contact, and/or site contact.
-
Which Simpro field provides customer data? betterbunch retrieves details from the Primary Customer Contact field.
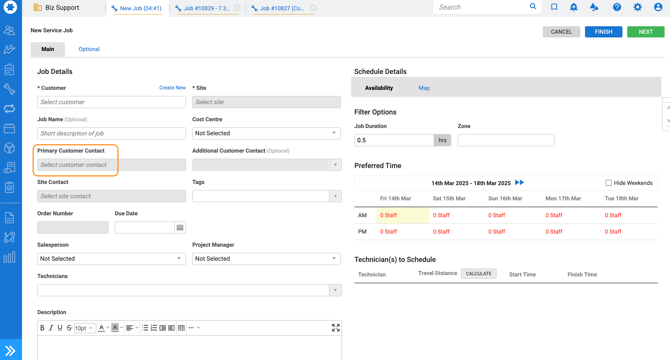
If the contact has a first name, betterbunch treats the contact as an individual, or if the contact’s first name is blank, betterbunch treats the contact as a company.
-
Can I exclude more than one cost centre, tag, or zone? Yes. You can enter multiple values for the exclusion type you choose.
-
Can I exclude across multiple categories at the same time? No. You can choose one exclusion category at a time, such as cost centre, tag, or zone.
-
How do I review communications between Simpro and betterbunch? You can view your Simpro automation logs from your betterbunch account.