Learn how to connect Simpro with betterbunch so that invitations are automatically created when your service is complete.
Improve your team's efficiency by automating the Invitation Creation process. Our automation feature connects Simpro with betterbunch to automatically send invitations on your behalf.
This feature is available with all betterbunch Pro plans.
How Simpro automation works
When a Simpro job reaches your chosen job status, a new invitation will be triggered.
betterbunch then checks the invitation to see if it meets your exclusion rules. If the job contains one of your excluded cost centres, zones or tags, the invite will be deleted.
If the job meets your sending rules, the invitation will be created and automatically sent to the chosen contact, which could be an individual, a company, and/or a site contact, at the time you have specified.
How to Connect Your Simpro Account for Automation
-
Login to your betterbunch account.
-
Head to the Automation page on the left menu.
- Click Connect to Simpro.
- Paste your Simpro URL into the textbox and select Connect to Simpro.
Learn how to find your Simpro URL here. - Login to the Simpro pop-up that appears, and follow the prompts to authorise the connection.
- If you have multiple companies connected to your Simpro subscription, select which company you want to connect from the dropdown menu, then click Connect Company.
- Select the job status from the first dropdown menu that will initiate the creation of an invitation.
- From the second dropdown menu, select the associated contacts you'd like to receive the invite.
- Click the third dropdown menu to select when you'd like your invitation to send. You can choose to send invitations at the following times:
- Best time to send: betterbunch uses data to decide when your recipient is most likely to open and respond to the invite
- Right away: This will send the message immediately after the trigger status has been met
- After delay: Here, you can choose to add a delay of X days so that a customer receives their feedback invitation X days after the trigger status has been met
- At specific time: Here, you can choose a specific time you would like your feedback invitations to be sent

- Once you're happy with your simPRO sending rules, select Next.
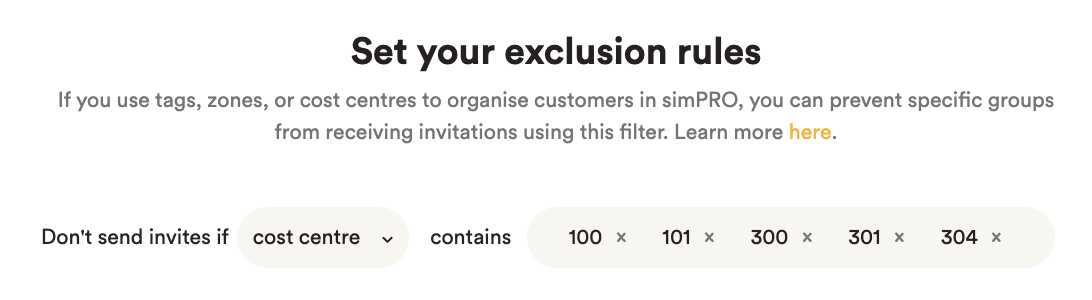
- Next, set your exclusion rules to block invitations from being created if a job meets the pre-defined exclusion filters. From the dropdown, select a category you would like to exclude.
You can choose from the below filters:- Tags
- Zones
- Cost centres
- In the textbox, type the keyword that identifies the job type you'd like to exclude. This needs to be an exact match of the categories you have in Simpro.
For example, you may choose to exclude any job that has the tag 'commercial'. - Select Next.
- Review your Simpro automation settings carefully. If you are satisfied with your configuration, click on 'I'm happy with that setup'. Alternatively, if you wish to make any changes, you can return to the automation rules by selecting 'Click here'.
- We recommend testing your setup by sending yourself a test invitation to ensure everything functions smoothly.
- Create a dummy job in Simpro using your own name, email address, and phone number as the contact details
- Update the job to reflect the trigger status you have configured.
- Once your defined sending rules are activated, you will receive your test invitation.
- To get the most out of your subscription, be sure to schedule a weekly timeslot to complete this checklist.
Frequently Asked Questions
Q: I have one Simpro account that services multiple sites. Can I use Simpro automation?
A: Yes. If you have one Simpro account that services multiple sites, you can choose to link one of the sites to your betterbunch account only.
Q: Can I have more than one job status that triggers the creation of an invitation?
A: No, you can only have one job status that triggers an invitation to be created.
Q: Can one job send invites to multiple contacts?
A: Yes. You can choose to send your feedback invites to the site, individual, and/or company contact.
Tip: We recommend you send invitations to all contacts associated with a job. Whenever possible, opt to send invites to all three contact records—individual, company, and site contact—to maximise your outreach.
Q: Which Simpro field does betterbunch use to retrieve customer data?
A: betterbunch retrieves contact information from the 'Primary Customer Contact' field within Simpro. 
Q: What is considered an Individual contact in Simpro?
A: If the 'Primary Customer Contact' field contains a contact record with a first name, the contact is considered an 'Individual' contact.
Q: What is considered a Company contact in Simpro?
A: If the 'Primary Customer Contact' field contains a contact record with a blank first name, it will be considered a 'Company' contact.
Q: Can I exclude more than one Cost Centre, Zone or Tag
A: Yes, you can enter multiple keywords in the exclusion textbox. betterbunch will search for all specified keywords, and if any are found in the record, the invitation will be automatically blocked.
Caution: Your exclusion filters must be an exact match of the categories in Simpro. betterbunch will look for the specified keywords or phrases, so it's essential to include spaces between individual words if they are separate entries in Simpro.
Q: Can I exclude a Cost Centre, a Zone, and a Tag at the same time?
A: You can only exclude one category at a time; it is not possible to combine exclusions from Zones, Cost Centres, and Tags at the same time.
Q: How do I review the communications between Simpro and betterbunch?
A: View your Simpro Automation communication logs here.
Tip: If you're looking for more ways to enhance or customise your Simpro automation settings, check out this article or contact us for help